


Most organizations have data flows enabled at some level. There are many types of flow formats, such as NetFlow, sFlow, and IPFIX. They can be used for anything from troubleshooting to statistics to security. Let’s look at the latter in relation to log ingestion, traditionally a problem in large environments.
Between different log formats, configuration options, and numerous input/output methods, what seems like a simple endeavor can turn into a massive time sink. The ability to fetch remote files, get them into a manageable structure, and output them into another platform has been problematic.
Take Apache NiFi—it’s specifically designed to process and distribute data. Best of all, it’s fairly simple to get up and running. You can even leverage NiFi as a basic syslog load balancer. Simply send unmodified data to it, then redistribute the data to destinations in a round-robin manner.
In this post we’ll look at two ways to put NiFi to work for you. I’m currently running NiFi on Ubuntu 19.10 Eoan Ermine. NiFi was installed using the official documentation along with references to a secondary guide for clarity. Once it’s up and running, you should be able to connect through your web browser on port 8080/TCP.
Netflow to syslog
In this example, we’ll use NiFi to ingest NetFlow v5 data, outputting the resulting information to a syslog server.
My Ubuntu instance already has a port mirror on interface eth1 of all internet traffic on my home network. Installation and configuration of NetFlow are simple:
sudo apt install fprobe
You’re prompted to specify the interface and NetFlow destination. Here, you’ll be using NiFi as the destination on port 2055/UDP. The next step is to build the flow in NiFi.
Start by creating a ListenUDP processor to receive data on port 2055/UDP. Drag it onto the canvas and double-click to open up its settings. Go to Properties, then plug in your interface and 2055 for the port value.
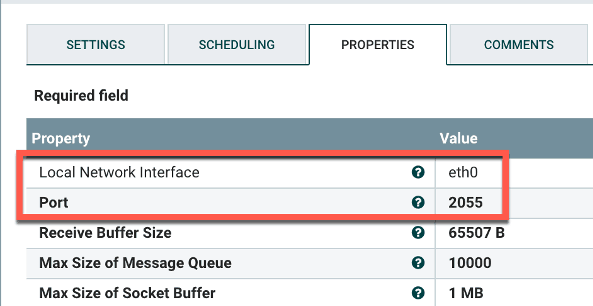
Figure 1: Create a ListenUDP processor to receive data on port 2055.
Now create a ParseNetflowv5 processor. Add it to the canvas and open its settings. Check failure and original under Automatically Terminate Relationships since you only want to pass along the parsed NetFlow record. There is nothing else to change; the processor natively understands NetFlow records.
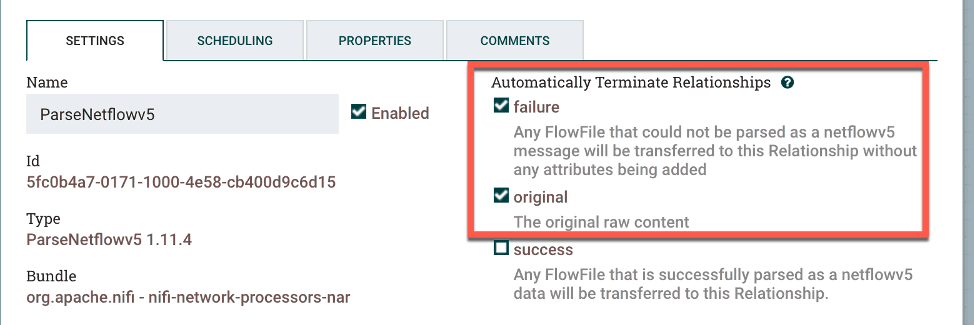
Figure 2: To create a ParseNetflowv5 processor add it to the canvas and checkfailure and original in settings.
Check success and failure under Automatically Terminate Relationships since this is the last processor in the flow. Now go to Properties and add the syslog hostname and destination port.
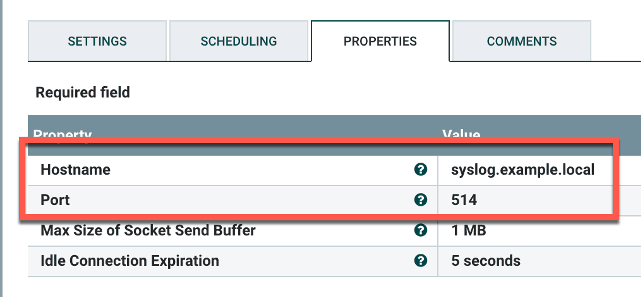
Figure 3: To create the PutUDP processor add the syslog hostname and destination port in Properties as the final steps.
Now to connect the processors. First, connect the GetUDP processor to the ParseNetflowv5 processor using success for the relationship. Next, connect ParseNetflowv5 to the PutUDP processor, also using success for the relationship.
Lastly, right-click the canvas and select Start. The processor indicators should turn green.
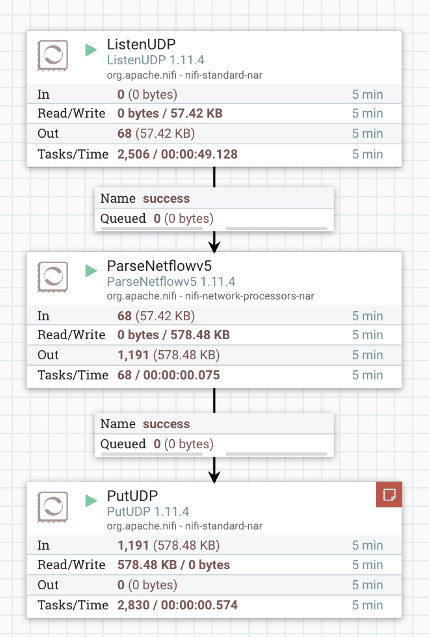
Figure 4: Process turn green when you finish set up.
The data should now be showing up in your syslog server. In the example shown below, I’ve used Elasticsearch to search for the phrase, netflowv5, to see its data:
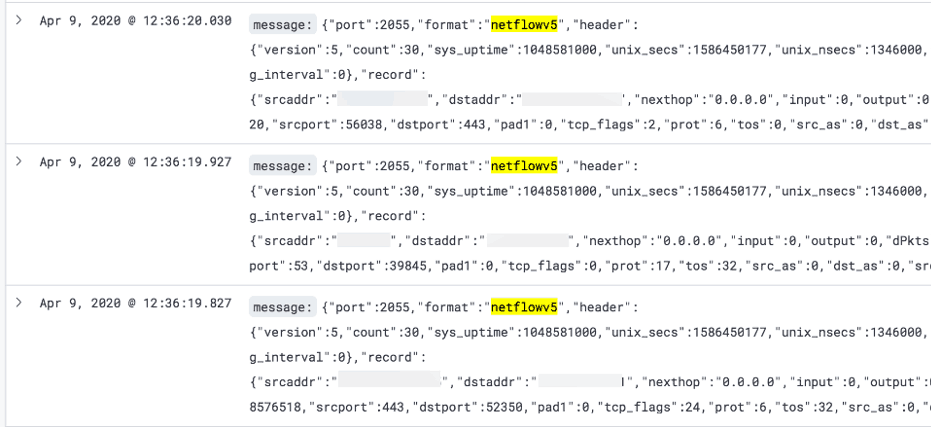
Figure 5: A search for the phrase netflowv5 pulls these results.
Success! Know there will be a lot of data on a busy network. Now let’s look at another way to use NiFi.
SFTP/CSV to Syslog/JSON
A remote file could encompass anything: data from HR, a dump from a database, or a CSV of application information. Here we’ll use SFTP to import a remote CSV file, reformat it to JSON, then output the lot to a syslog server. This is easy using NiFi.
Assume you have a CSV being dumped to a remote host every 15 minutes. You’d like the processor to check for a new file every 60 seconds, fetch the CSV, process it, then delete the file. This example uses the following remote server file and directory structure:
File name: APPLICATION_OUTPUT-1586265224.CSV
Directory: /tmp/APP_LOGS
The CSV format looks like this, including a header:
id,first_name,last_name,email,ip_address
1,Vincent,Pimblott,[email protected],30.239.57.185
2,Kimmy,Bragge,[email protected],218.159.125.3
3,Ursula,Mosconi,[email protected],106.131.117.125
4,Joline,Cogman,[email protected],44.57.107.49
The first step is to create a GetSFTP processor to fetch a remote file on a specified interval, ingest it, then pass it along. Drag the processor onto the canvas and plug in the following settings:
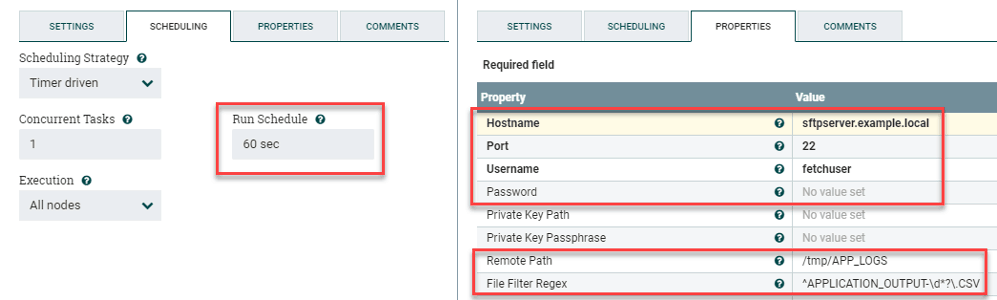
Figure 6: To create a GetSFTP process to fetch a remote file at a defined interval drag the process onto the canvas and select the following.
We’ll use regex to grab the file. The assumption is that its name starts with APPLICATION_OUTPUT and includes an epoch timestamp. These are the second group of settings shown above, right:
Remote Path: /tmp/APP_LOGS
File Filter Regex: ^APPLICATION_OUTPUT-\d*?\.CSV
Create a ConvertRecord processor next. It’ll convert the CSV data to JSON. Double-click the processor and go to its settings. Check failure under Automatically Terminate Relationships to instruct NiFi to drop anything that it can’t process.
Now go to Properties and select Create New Service. Choose CSVReader for the Record Reader and JSONRecordSetWriter for the Record Writer. Click Apply when finished to save the settings.
Now you need to configure these two services. Return to Properties of the same ConvertRecord processor. You’ll notice two → for the services you’d created. Click either one open the service settings. You’ll see a screen similar to this:
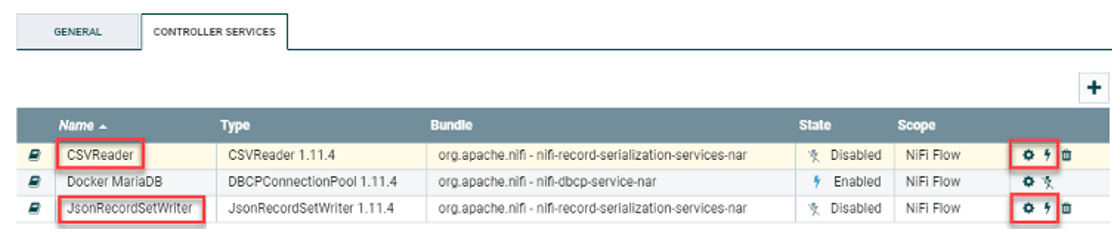
Figure 7: Service settings when you configure the ConvertRecord processor.
Note that the new services are disabled by default. They need to be configured before you enable them. Click the gear icon (at right) for the CSVReader. Many settings can be tweaked for this, but you’ll only need to change False to True:
Treat First Line as Header: True
Click Apply when done. This instructs the reader to use the CSV’s header line to identify its contained values. No settings need to be changed for the JSONRecordSetWriter. Next, click each lightning bolt icon adjacent to the gear icons (above, right) to enable the services. Click Enable for each, then close the settings page.
Now you’ll create a SplitJSON processor back on the main canvas. It’ll break up the JSON object into individual lines instead of one giant data blob. Change the following single value:
JsonPath Expression: $.*
You only want this processor to pass the split JSON data onto the next processor, so select failure and original under Automatically Terminate Relationships in the processor settings.
Last in the chain is the creation of a PutUDP processor; it’ll output the JSON records to a syslog server. Create the processor, then go to its settings and check success and failure under Automatically Terminate Relationships. Next go to its Properties and plug in the values for your syslog server:
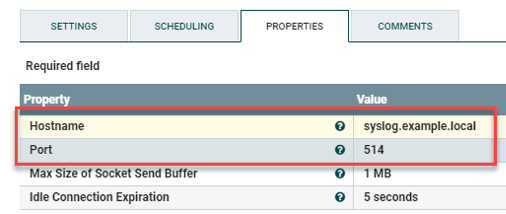
Figure 8: Type in the values for your syslog serve under Properties when you create the PutUDP processor.
Now to connect the NiFi processors.
- First connect the GetSFTP and ConvertRecord processors with success selected under For Relationships.
- Connect ConvertRecord and SplitJSON processor, also with success selected under For Relationships.
- Now connect the SplitJSON and PutUDP processors with split for the relationship.
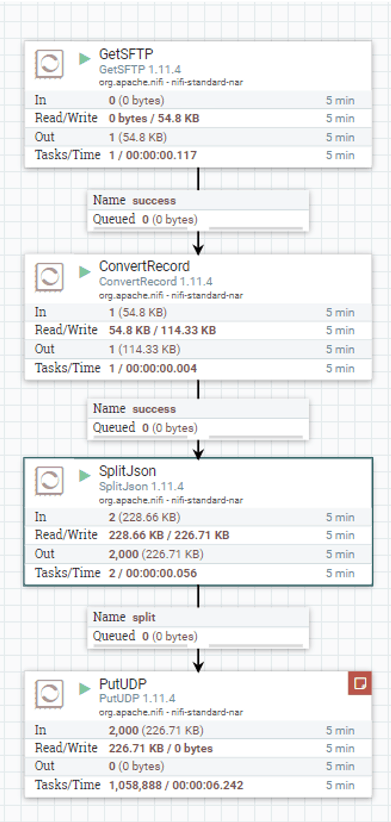
Figure 9: Connect the NiFi processors.
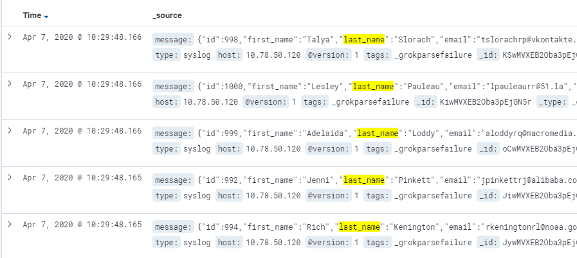
Figure 10: How the final data on your syslog server may look like using Elasticsearch.
Similar Posts

Augmenting Microsoft Sentinel SIEM: The Power of Exabeam for UEBA and TDIR

Exabeam Unveils 2023 Partner of the Year Award Winners

Exabeam IRAP Assessment Completion Creates New Opportunities for Partners in Australia
Recent Posts

What’s New in Exabeam Product Development – March 2024

Take TDIR to a Whole New Level: Achieving Security Operations Excellence

Generative AI is Reshaping Cybersecurity. Is Your Organization Prepared?
Stay Informed
Subscribe today and we'll send our latest blog posts right to your inbox, so you can stay ahead of the cybercriminals and defend your organization.
See a world-class SIEM solution in action
Most reported breaches involved lost or stolen credentials. How can you keep pace?
Exabeam delivers SOC teams industry-leading analytics, patented anomaly detection, and Smart Timelines to help teams pinpoint the actions that lead to exploits.
Whether you need a SIEM replacement, a legacy SIEM modernization with XDR, Exabeam offers advanced, modular, and cloud-delivered TDIR.
Get a demo today!