-
- Home
>
-
- Blog
>
-
- InfoSec Trends
Apache NiFi, SQL Server, and Kerberos Authentication
- Sep 08, 2020
- Nate Labadie
- 5 minutes to read
Table of Contents
As part of your cybersecurity assessment, perhaps you’re wanting to use Kerberos authentication to query a Microsoft SQL Server and output that data in syslog format. Apache NiFi is capable of doing all of this with minimal configuration.
In this post, the third of our series on using NiFi, you’ll learn how to set up Apache NiFi to pull from a SQL database with Kerberos authentication, convert the output to JSON format, then stream that to a remote log collection platform.
Test Domain Configuration
Note: If you already have SQL Server connected to Active Directory and use Kerberos authentication, you can likely skip to the Creating the NiFi Flow subheader.
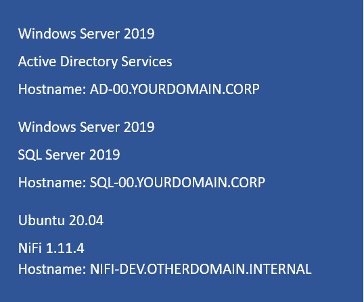
For our test domain, yourdomain.corp, we deployed Windows Server 2019 (AD-00) for its Active Directory services and another Windows Server 2019 (SQL-00) running SQL Server 2019. Figure 1 shows that we also setup NiFi on a Ubuntu server (NIFI-DEV).
Both the SQL-00 and NIFI-DEV servers point to the AD-00 server for authentication. A simple NSLOOKUP query lets you check Kerberos settings (Figure 2).

We created a nifilogin service account on yourdomain.corp to authenticate NiFi via Kerberos
on the SQL Server. Because we didn’t have an actual SQL database to test against, we installed Microsoft SQL Server Management Studio and downloaded the AdventureWorks database for this purpose.
Next we created a user account — nifilogin — for database access, using “Windows authentication” for the user authentication type.
Configuring NiFi
You can configure NiFi using our prior instructions found here. It’s a Java app that can run on various platforms, but here we’re using Ubuntu 20.04 and OpenJDK 11.
Ensure the NiFi server uses the same DNS server as your Active Directory domain. It doesn’t need to be part of the AD environment, but does need to use the same DNS server. For our testing, we used AD-00 as the DNS resolver. This lets the NIFI-DEV server resolve everything associated with the YOURDOMAIN.CORP domain.
Adding SQL drivers and configuring Kerberos
There are a number of JAR files depending upon your Java version. We downloaded the version 11 SQL driver from this GitHub repository. Next we created the Kerberos configuration directory:
sudo mkdir /opt/nifi/kerberos
Then it was on to adding its configuration files (Figure 3).
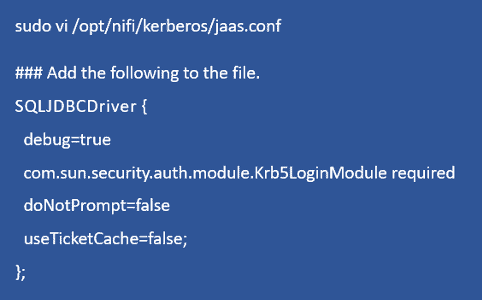
Notes:
- debug=true may be removed from a production version.
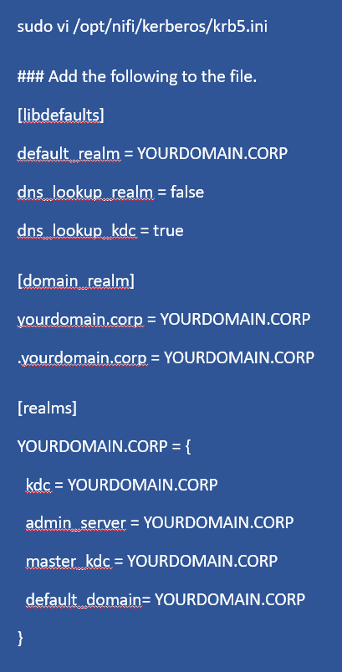
- Kerberos likes everything to be in uppercase (Figure 4).
Now you need to load these files into the NiFi configuration (Figure 5). Note that the numerical value in java.arg should be sequential, e.g., java.arg.18.
Note: java.arg.20 is only included for debugging purposes and may be left out.

Now it’s time to restart NiFi and tail the log file to ensure there aren’t any errors (Figure 6).

Creating the NiFi Flow

Now you’ll log into the NiFi interface and listen on the default port 8080 (Figure 7). Then you’ll add DBCPConnectionPool controller service to provide the NiFi flow with the SQL connection details, including its authentication components. To do this:
- Click a blank portion of the NiFi canvas, such that nothing is selected.
- Click the gear icon in the lower-left portion of the canvas.
- Go to Controller Services and click the +
- Select DBCPConnectionPool, then click Add.
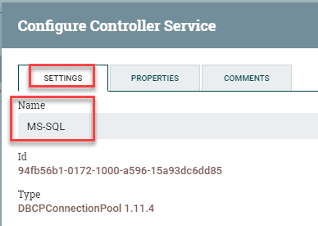
Now rename DBCPConnectionPool to MS-SQL(Figure 8) for easy later identification and add the following settings to it (Figure 9):
Database Connection URL:
jdbc:sqlserver://SQL-00.YOURDOMAIN.CORP;database=AdventureWorks2017;integratedSecurity=true;authenticationScheme=JavaKerberos;
Database Driver Class Name: com.microsoft.sqlserver.jdbc.SQLServerDriver
Database Driver Location: /opt/nifi/drivers/mssql-jdbc-8.3.1.jre11-preview.jar
Database User: [email protected]
Password: p4ssw0rd#$
For a production environment, you’ll want to swap out its host name, database name, driver location, and credentials with your own values. Also change Database Connection URL to reflect your SQL server and the database name you’ll be querying.)
In addition, the Database Driver Location will include the name of the MS-SQL JAR file you downloaded earlier. Be sure to change the Database Name and Password (Figure 9).

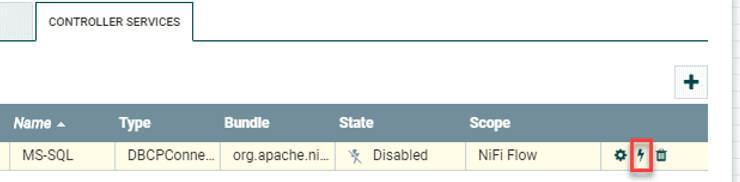
Click Apply when done followed by the lightning-bolt icon (Figure 10).
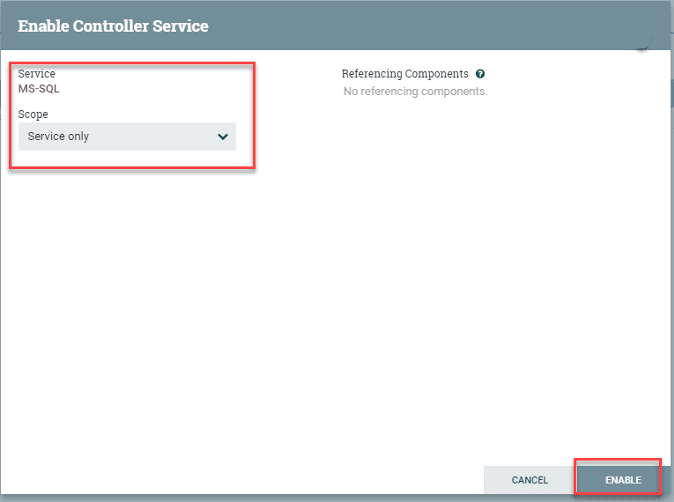
Another window pops up (Figure 11); leave it as Service only and click [Enable].
Now you’ll add one of several NiFi processors.
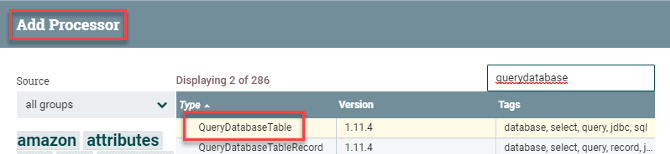
Double-click the NiFi canvas to open its settings, then select Add Processor. Add QueryDatabaseTable (Figure 12). By adding the following values, configure it as follows by way of the Scheduling and Properties tabs:
Scheduling (query the table for new data once per minute):
Run Schedule: 1 min
| Properties | Notes |
| Database Connection Pooling Service: MS-SQL | The controller service you created earlier |
| Database Type: MS SQL 2012+ | This version should cover most use cases |
| Table Name: HumanResources.Employee | Essentially a “select * from HumanResources.Employee” |
| Maximum-value Columns: BusinessEntityID | An auto-incrementing value to prevent NiFi from fetching the entire table each time |
Table 1: QueryDatabaseTable processor properties
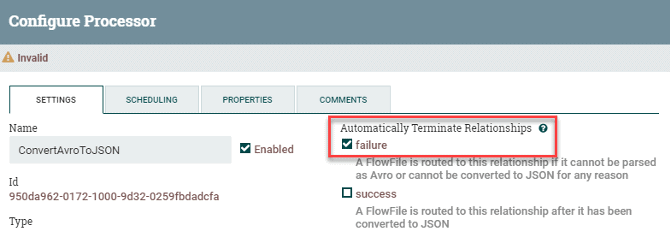
The next processor you’ll add instructs NiFi to take the database query results and convert them to JSON format. This works great with a SQL query since you’re dealing with name:value pairs.
Using the same method as with the first processor, add the ConvertAvroToJSON processor. To configure it, simply select the failure option in Settings > Automatically Terminate Relationships (Figure 13).
By default, the query output will be one giant blob of data. You’ll want to split it into individual events that will be converted over to syslog, so now add a SplitJson processor to NiFi. In configuring it, select both the failure and original options in Settings > Automatically Terminate Relationships. In its Properties, adding a $.* value to JsonPath Expression splits each line into a new event.
The final processor to add takes the individual events and converts them to native syslog format. So for this last PutUDP processor, select both the failure and success options in Settings > Automatically Terminate Relationships. This terminates the data flow. Add the following values to its Properties:
Hostname: rsyslog.yourdomain.corp
Port: 514
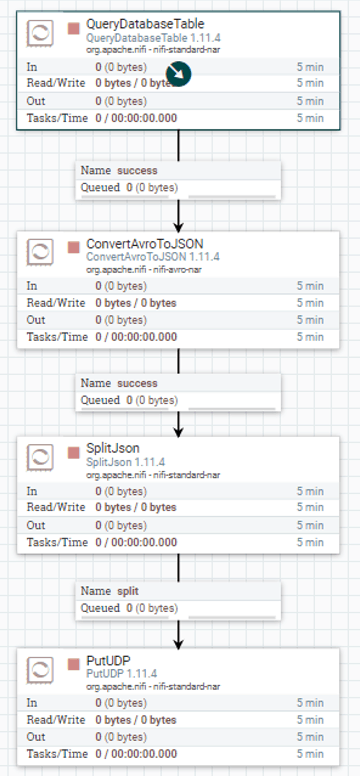
Now you’ll connect the four processors (Figure 14).
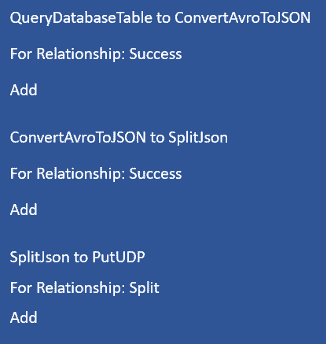
Figure 15 is a visual representation of what’s going on. The last step is to click a blank spot in the canvas so nothing is selected. Right click on it, then select Start. NiFi should start pulling events from the database, converting them to JSON, and streaming them out to syslog.

Admittedly it took us a bit of trial and error to get this SQL Server <> NiFi setup to function correctly. For troubleshooting steps, visit https://nathanlabadie.com/apache-nifi-ms-sql-and-kerberos-authentication/.
Further reading
I hope you found this useful. Let me know if you have questions by commenting on any of our social channels on LinkedIn, Twitter or Facebook.
Learn More About Exabeam
Learn about the Exabeam platform and expand your knowledge of information security with our collection of white papers, podcasts, webinars, and more.