
- Home >
- Blog >
- InfoSec Trends
How to Syslog Windows Logs for Free
- May 14, 2020
- Jim Chrisos
- 7 minutes to read
Table of Contents
Once in a while I come across a customer who is struggling to collect Windows logs. While there are excellent commercial solutions I usually start by recommending trusted free solutions due to the small barrier they pose to implementation (i.e. no budget/procurement issues to overcome). One of the free solutions I recommend is NXLog. This provides a method to collect Windows events and send them to a logging server via syslog. In this article I will cover the installation of the free NXLog Community Edition and its configuration.
Why collect Windows events?
Windows events are one of the most valuable log sources when performing incident response, yet many organizations fail to consistently collect and store them. Storing logs (and retrieving/searching these logs) is its very own topic but here I will discuss one way to quickly and cheaply (free) get logs off of your Windows machines and into a data lake/SIEM/analytics tool via syslog.
How to collect Windows events on any system
Windows logs its events in the Windows Event Log (EVT/EVTX) format. There is no built in means to get these logs to another system. Well, technically you can use Windows Event Forwarding (WEF) to ship these logs around but they still exist only on Windows machines. How do we get them into another system? We’ll be using a tool called NXLog Community Edition to send Windows logs via syslog. While NXLog does publish commercial software, the Community Edition is free (as in speech). It is open source, freely downloadable and does not include a time-based trial like some of its competitors.
Keeping with the theme of being free, there used to be a free Snare agent, and technically there still is, but Snare Lite is now legacy in favor of the Snare free trial. You’re more than welcome to give that a go, and perhaps I’ll write a post about setting up Snare down the road. But for now the focus is going to remain on NXLog Community Edition.
Installing and configuring NXLog
At this point I assume you have an idea what logs you wish to collect and where to send them. With this in mind, let’s install our agent.
- Download and install the NXLog CE agent. It’s a very easy install on Windows. Accept the license, click next a couple times and you’re done!
- Make a backup of the nxlog.conf config file located in “C:Program Files (x86)nxlogconf” (or the conf folder of wherever you installed the NXLog agent).
Next we need to configure the agent and start it. To begin, open the nxlog.conf file for editing (again, you should have a backup of this file first). I removed most of the information at the end of the default file and kept the beginning. Below is what I kept of the original config file:
Panic Soft
#NoFreeOnExit TRUE

define ROOT C:Program Files (x86)nxlog
define CERTDIR %ROOT%cert
define CONFDIR %ROOT%con
define LOGDIR %ROOT%data
define LOGFILE %LOGDIR%nxlog.log
LogFile %LOGFILE%

Moduledir %ROOT%modules
CacheDir %ROOT%data
Pidfile %ROOT%datanxlog.pid
SpoolDir %ROOT%data

<Extension _syslog>
Module xm_syslog
</Extension>
Along with this base configuration we need to tell NXLog three things.
- What is our input? In other words, what logs do we want to collect?
- Configure our output by setting up where and how we want to ship our logs.
- Define a route for our logs.
For the Input, you can add something like this to the end of your nxlog.conf config:
<Input Security> Module im_msvistalog <QueryXML> <QueryList> <Query Id='0'> <Select Path='Security'>*[System/Level<4]</Select> </Query> </QueryList> </QueryXML> </Input>
There are a few things I want to point out here. First, you can name your input whatever you want. I chose ‘Security’ because I am collecting security logs as indicated by my select statement.
You have the option to use different input modules but since this article is focused on collecting Windows logs you would either use im_msvistalog or im_mseventlog. The former is for Windows XP, 2000 and 2003. For Windows 2008, Vista and later you would use the latter. In my example above I used the im_msvistalog module. If you’re curious, the ‘im’ indicates we’re working with an input module.
Back to that select statement, this is where you will tell NXLog what logs you wish to collect. Common options, in addition to the Security logs in my example above, may include Application logs and/or System logs. They can be collected with “<Select Path=’Application’>*</Select>” or “<Select Path=’System’>*</Select>”, respectively, and placed on their own line right after the other select statements. If you are using WEF and wish to install NXLog on a Windows Event Collector, you can use “<Select Path=”ForwardedEvents”>*</Select>”. To collect Sysmon events, use “<Select Path=”Microsoft-Windows-Sysmon/Operational”>*</Select>”. Getting more granular than this is out of the scope of this article but you can read more about queries here and here.
For our output you can add something like this to your nxlog.conf file after your Input section:
<Output DL>
 Module om_udp
 Host 192.168.0.250
 Port 514
 Exec to_syslog_snare();
</Output>
What I did here is named my Output section “DL” since I’m sending my logs to a data lake but you can name your Output section whatever you want. The module I’m using is om_udp which will send my logs over UDP. By the way, the “om” in the name means this is an output module. Other common output modules include om_tcp for TCP or om_ssl for SSL.
You can enter the hostname or IP of your logging destination for the Host field. Port is — you guessed it — the IP port you’ll want to use. Finally is our Exec statement which we’ll be using to define our output format. I am using the Snare format in my example above but other valid options are to_syslog_ietf() or to_syslog_bsd().
To tie this all together we need to define our route. The route statement, similar to our input and output statements can have a friendly name. Mine is called ‘eventlog_to_DL’. The only configuration item here is our path. Below you’ll see mine is “Security => DL” which is basically my input and output glued together with a ‘=>’.
<Route eventlog_to_DL>
 Path Security => DL
</Route>
Now that NXLog is configured you can start the service. Open a command prompt and run ‘net start nxlog’ to start the service (similarly you can stop the service with ‘net stop nxlog’). Check the log file for errors. The log file is at — if you used the default options — “C:Program Files (x86)nxlogdatanxlog.log”. If it starts successfully you won’t see much. Here is the log from a successful start:
2020-04-29 11:53:03 INFO nxlog-ce-2.10.2150 started
As an example of things going wrong, I took my working config and purposely misspelled the output module om_udp as om_udpp. After starting the NXLog service, here is the resulting log:
2020-04-29 12:00:10 ERROR Failed to load module from C:Program Files (x86)nxlogmodulesoutputom_udpp.dll, The specified module could not be found. ; The specified module could not be found.
2020-04-29 12:00:10 ERROR module 'DL' is not declared at C:Program Files (x86)nxlogconfnxlog.conf:50
2020-04-29 12:00:10 ERROR route eventlog_to_DL is not functional without output modules, ignored at C:Program Files (x86)nxlogconfnxlog.conf:50
2020-04-29 12:00:10 WARNING no routes defined!
2020-04-29 12:00:10 WARNING not starting unused module Security
2020-04-29 12:00:10 INFO nxlog-ce-2.10.2150 started
As you can see the error messages are helpful to a degree but always double and triple check your spelling and punctuation.
Conclusion
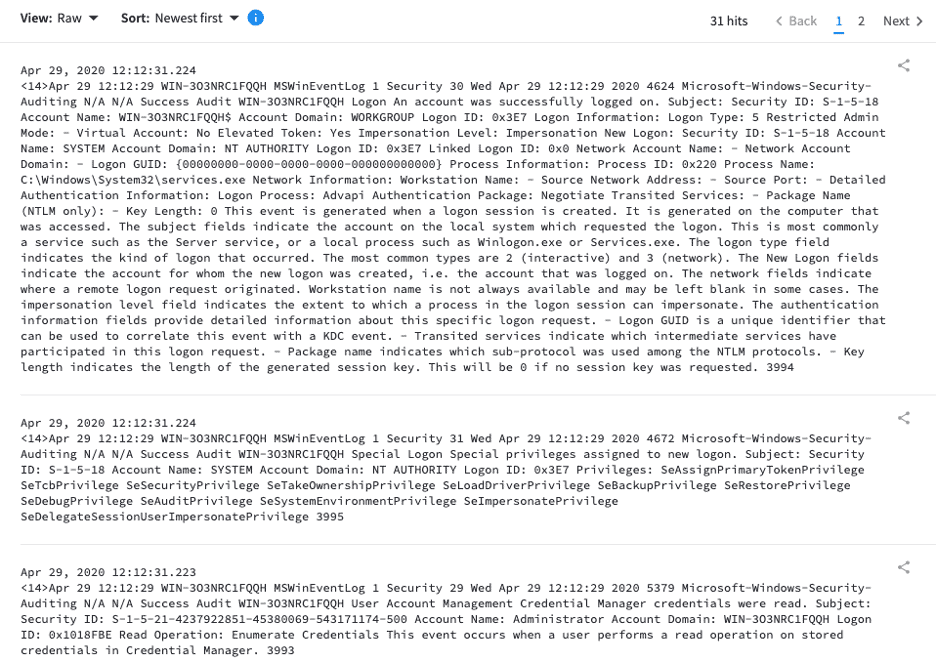
At this point you should have a working NXLog agent forwarding logs to a syslog server somewhere on your network. Below is an example of logs being sent to my Exabeam Data Lake in the Snare format:
NXLog Community Edition is extremely flexible and has very complete and well-written documentation. If you look there you’ll see much more than what I’ve covered here. In fact I’ve really simplified things with the sole purpose of sending Windows logs over syslog so please don’t discount the tool based on the narrow set of features and options I’ve written about.
I hope this article has helped at least one person collect Windows logs when they previously weren’t. If you fall into this camp, I’d love to hear from you so please comment on our social media platforms. If you have any feedback or would like to see a similar write up for another tool I’d love to hear from you as well so please leave a comment as well!
References
Here is a copy of a basic, working config for NXLog:
Panic Soft #NoFreeOnExit TRUE define ROOT C:Program Files (x86)nxlog define CERTDIR %ROOT%cert define CONFDIR %ROOT%conf define LOGDIR %ROOT%data Panic Soft #NoFreeOnExit TRUE define ROOT C:Program Files (x86)nxlog define CERTDIR %ROOT%cert define CONFDIR %ROOT%conf define LOGDIR %ROOT%data define LOGFILE %LOGDIR%nxlog.log LogFile %LOGFILE% Moduledir %ROOT%modules CacheDir %ROOT%data Pidfile %ROOT%datanxlog.pid SpoolDir %ROOT%data <Extension _syslog> Module xm_syslog </Extension> # Name your input, in my case it's named ‘Security’. <Input Security> # For WinXP, 2000 and 2003, use 'im_mseventlog'. Module im_msvistalog <QueryXML> <QueryList> <Query Id='0'> <Select Path='Security'>*[System/Level<4]</Select> </Query> </QueryList> </QueryXML> </Input> # Name your output, in my case it's ‘DL’ since I'm sending logs to a Data Lake. <Output DL> # Name the module to use (om_udp for UDP, om_tcp for TCP, om_ssl for SSL, etc). Module om_udp # The IP or hostname of the destination for your logs. Host 192.168.0.250 # The port to send logs to. Port 514 # The output format you wish to use. Other options are to_syslog_ietf() or to_syslog_bsd(). Exec to_syslog_snare(); </Output> # Name your route. I named mine eventlog_to_DL <Route eventlog_to_DL> # Choose your input and output. I used my 'Security' input from above and 'DL' from my output. Path Security => DL </Route>

Jim Chrisos
Principal Sales Engineer | Exabeam | Jim officially started working in security as an analyst at a large MSSP. This experience enabled him to gain employment at large global organizations as an analyst before becoming an incident handler. As an incident handler, he witnessed nation state attacks. This left such a profound impact on Jim that he wanted to do whatever he could to assist other organizations to defend against this threat. An opportunity arose that introduced a career change and ensuing uncertainty for Jim, now a seasoned incident handler. Jim took this chance with a small, unknown startup named FireEye and got into sales. Jim has been a sales engineer since that time and has not looked back.
More posts by Jim ChrisosLearn More About Exabeam
Learn about the Exabeam platform and expand your knowledge of information security with our collection of white papers, podcasts, webinars, and more.