
-
- Home
>
-
- Explainers
>
-
- Rapid7
Rapid7 Nexpose Solution Overview: Pros, Cons, and Quick Tutorial
- 8 minutes to read
Table of Contents
What Is Rapid7 Nexpose?
Rapid7 Nexpose is a vulnerability management tool that helps organizations identify, assess, and remediate security vulnerabilities within their IT environments. It provides continuous scanning capabilities and detailed reports to understand security risks. The platform integrates with various security tools, enabling users to maintain a defense against potential threats. Nexpose covers IT assets like servers, desktops, and web applications.
Nexpose categorizes vulnerabilities and assigns risk scores, helping teams prioritize response efforts. The platform supports IT compliance initiatives by aligning scans with regulatory requirements, including PCI-DSS and HIPAA. Nexpose’s dynamic scanning capabilities allow organizations to adapt quickly to changes in their environments. The tool’s dashboard and reporting features allow security teams to communicate risks and remediation progress.
Recommended Reading: What Is SIEM, Why Is It Important and 13 Key Capabilities.
Rapid7 Nexpose Features
Real Risk Score
Nexpose uses a risk score scale from 1 to 1000, in risk assessments.
This score factors in various conditions, such as the age of the vulnerability and the availability of public exploits or malware kits. Additionally, Nexpose allows users to tag and prioritize systems critical to business operations.
Adaptive Security
Nexpose uses an adaptive security feature, which automatically detects and evaluates new devices and vulnerabilities as soon as they appear on the network.
Nexpose integrates with cloud platforms like VMware and AWS, to monitor dynamic environments. This real-time scanning, combined with data from Rapid7’s Sonar research project, provides security teams with a live view of their infrastructure.
Policy Assessment
Ensuring compliance with industry standards is a critical part of maintaining a secure IT environment. Nexpose includes policy assessment features that allow organizations to benchmark their systems against widely recognized standards like CIS and NIST.
The platform simplifies the process of hardening systems by providing steps in its remediation reports. These reports help security teams understand which tasks will have the greatest impact on improving compliance and reducing security risks.
Remediation Reporting
Nexpose offers detailed reports that prioritize actionable steps for IT teams. Instead of overwhelming users with extensive reports, the platform narrows down the remediation process to the most impactful actions.
Nexpose offers targeted guidance, focusing on 25 key tasks to reduce risk.
Integration with Metasploit
To validate vulnerability findings, Nexpose integrates with Metasploit Pro, Rapid7’s penetration testing tool. This integration enables security teams to simulate real-world attacks on their systems, testing whether identified vulnerabilities can actually be exploited. By integrating vulnerability scanning with attack simulation, Nexpose ensures that security efforts are focused on addressing vulnerabilities that present the greatest risk.
Rapid7 Nexpose Limitations
While Rapid7 Nexpose offers extensive vulnerability management features, it also comes with several important limitations. The following limitations were reported by users on the G2 platform:
- Complex setup: The initial setup process is quite complicated, especially for organizations with limited resources. Configuring the tool and ensuring that it integrates smoothly into an IT environment can take considerable time and expertise.
- High cost: Nexpose is more expensive compared to other vulnerability management tools, making it less accessible for smaller businesses or organizations with budget constraints.
- False positives: Some users report frequent false positives in scan results. This can lead to unnecessary remediation efforts, consuming time and resources that could be better spent addressing actual vulnerabilities.
- Buggy security console: Users have noted that the Security Console can be buggy, which affects the overall usability of the tool.
- Unreliable Jira integration: Although Nexpose claims to integrate with Jira for issue tracking, this integration has been described by some users as unreliable and prone to breaking.
- Slow vulnerability identification: In some cases, Nexpose takes several days to identify vulnerabilities, even critical ones. This delay can pose significant risks, especially when timely remediation is crucial.
- High administrative overhead: Managing Nexpose requires significant administrative effort. From credential management to ensuring proper connectivity for scans, maintaining the tool can be labor-intensive.
- Lack of a query builder: The absence of a query builder limits the tool’s search capabilities, making it difficult to track remediation progress and manage vulnerabilities effectively over time.
Quick Tutorial: Getting Started with Rapid7 Nexpose
This tutorial will give you an idea of the process required to deploy Rapid7 Nexpose and start using it to scan a site. The instructions in this section are adapted from the Rapid7 documentation.
Download and Install on Linux
Here is how to start using Rapid7 Nexpose in a Linux environment:
- Download the necessary files: You will need two files to get started: the latest Nexpose Linux installer and its corresponding checksum file. The checksum file is used to verify that the installer has not been corrupted during download. These files should be obtained from Rapid7 source, either through a purchase email or evaluation registration.
- Product key: Ensure you have the product key available, which will be used to activate your Nexpose license after installation. This key is usually sent to you via email upon purchase or when signing up for an evaluation version.
- Disable SELinux: Nexpose requires that SELinux (security-enhanced linux) be disabled before installation. To check its current status, open a terminal and navigate to the SELinux configuration file using the following command: vi /etc/selinux/config. Once in the file, find the line that starts with SELINUX=. If the value is set to enforcing, change it to disabled. Save the changes and reboot the system.
- Install tmux or screen: It is recommended to install terminal multiplexer tools like tmux or screen. These tools allow you to maintain session continuity, ensuring that your terminal stays interactive while the security console and engine are running.
- Verify the installer integrity: Before proceeding with the installation, it’s essential to verify that the installer file has not been altered or corrupted. This is done by comparing the checksum of the downloaded installer with the provided checksum file. Move both the installer and checksum file into the same directory, open a terminal, and run the command sha512sum -c <installer_file_name>.sha512sum.
- Run the installation: Make the installer executable by running the command: chmod +x <installer_file_name>. Start the installation by executing the installer file: ./<installer_file_name> -c. Follow the on-screen instructions provided by the installation process. Make sure not to close any command line windows that appear during this process, as they are required for the installation to complete properly.
Once the installation is complete, you’ll be able to log in to the Nexpose Security Console and begin configuring your environment for vulnerability management.
Get Familiar with the Console
After completing the installation, the Nexpose Security Console serves as your primary interface for managing security scans and analyzing risk. Here’s a breakdown of key features and how to navigate the console:
Home Page Overview
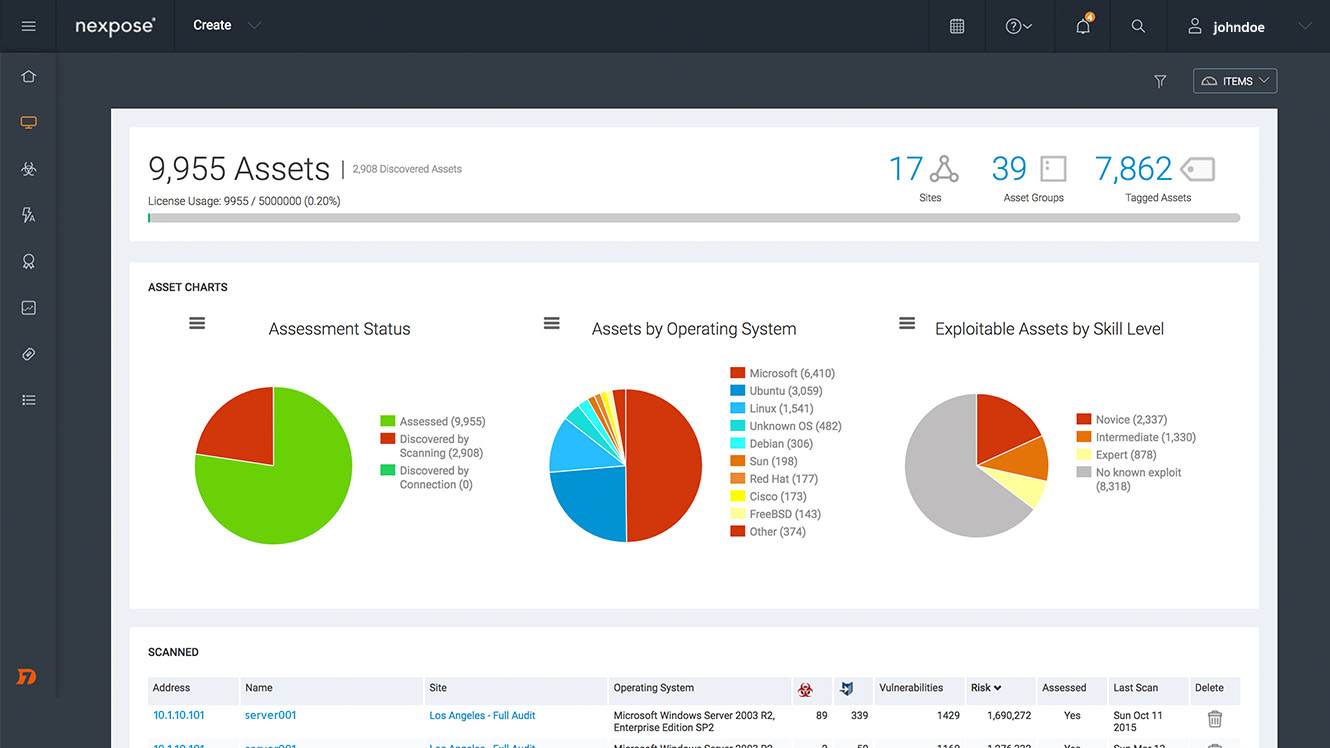
When you log into the Nexpose Security Console, the home page is the first interface you’ll see. It provides an at-a-glance summary of your security environment and includes several key sections:
- Risk and assets over time: This is a dynamic chart that tracks your total number of scanned assets and their associated risk scores. By displaying this data over time, it helps you visualize how the risk in your environment changes relative to the number of assets.

- Sites: In Nexpose, a “site” is a logical grouping of assets that you want to scan. The Sites table shows all the sites you’ve configured, including metrics such as site status, number of assets, and any ongoing scans. From here, you can quickly navigate to individual sites for further actions like viewing results or initiating scans.
- Current scans for all sites: This table displays a list of all scans currently running across your environment. You can monitor scan progress and access details about each scan in real-time.
- Asset groups: Asset groups are used to organize and report on your assets. These groups are based on specific criteria like asset type or vulnerability status.
- Asset tags: Nexpose allows you to tag assets, sites, and asset groups with predefined or custom tags. Tags provide additional context and make it easier to filter and search through your assets during analysis.

Additional Functions on the Home Page
The home page includes a navigation menu on the left that provides quick access to major features. There are also tabs or creating sites, running reports, and managing assets:
- Create: The Create dropdown allows for the quick creation of common objects like sites, asset groups, or tags.
- Filtered asset search: This tool allows you to search for assets based on custom criteria like IP range, operating system, or risk score.
- Notification center: This provides alerts and notifications related to scan results, system health, and vulnerability updates. Each notification is color-coded by importance, and critical issues are flagged for immediate attention.
Create and Scan Your First Site
Once the Security Console is set up, the next step is to configure your first site and run an initial vulnerability scan. Here’s how to do it:
- Create a new site:
- From the Home Page, click on the Create dropdown and select Site.
- On the Site Configuration page, enter a descriptive name for the site that reflects the group of assets you plan to scan. Optionally, you can add a description to clarify the purpose of the site.
- Under Assets, specify the assets that you want to include in the scan. This can be a single IP address, a range of IP addresses, or an asset group. Nexpose allows you to add assets by manually entering their IP addresses or by importing a list.

- Configure authentication:
- To scan systems that require authentication, such as databases or internal servers, you’ll need to provide valid credentials. Go to Authentication and click Add Credentials.
- In the credentials setup, assign a name and description to the credential for easy identification. Then, input the username and password for the authentication service you’re using, such as SSH or Windows authentication.
- Nexpose allows you to test the credentials to ensure they work properly. Select an IP address or hostname from your list of assets and click Test Credentials. If the credentials are correct, a confirmation message will appear. If there’s an issue, Nexpose will provide an error message, such as “Invalid Credentials” or “Connection Refused.”
- Run a full scan:
- Once your site is configured and credentials are tested, you can initiate your first scan. Select the Full Audit without Web Spider scan template, which performs a comprehensive audit of all vulnerabilities on your assets without scanning web applications.
- Next, choose the Scan Engine that will perform the scan. Nexpose allows you to manage multiple scan engines if your environment is distributed.
- Click Save & Scan to begin the scan. The progress will be displayed in real-time on the site’s details page. Once the scan is complete, Nexpose will update the Scan Status to “Completed Successfully,” or provide troubleshooting steps if the scan encounters issues.
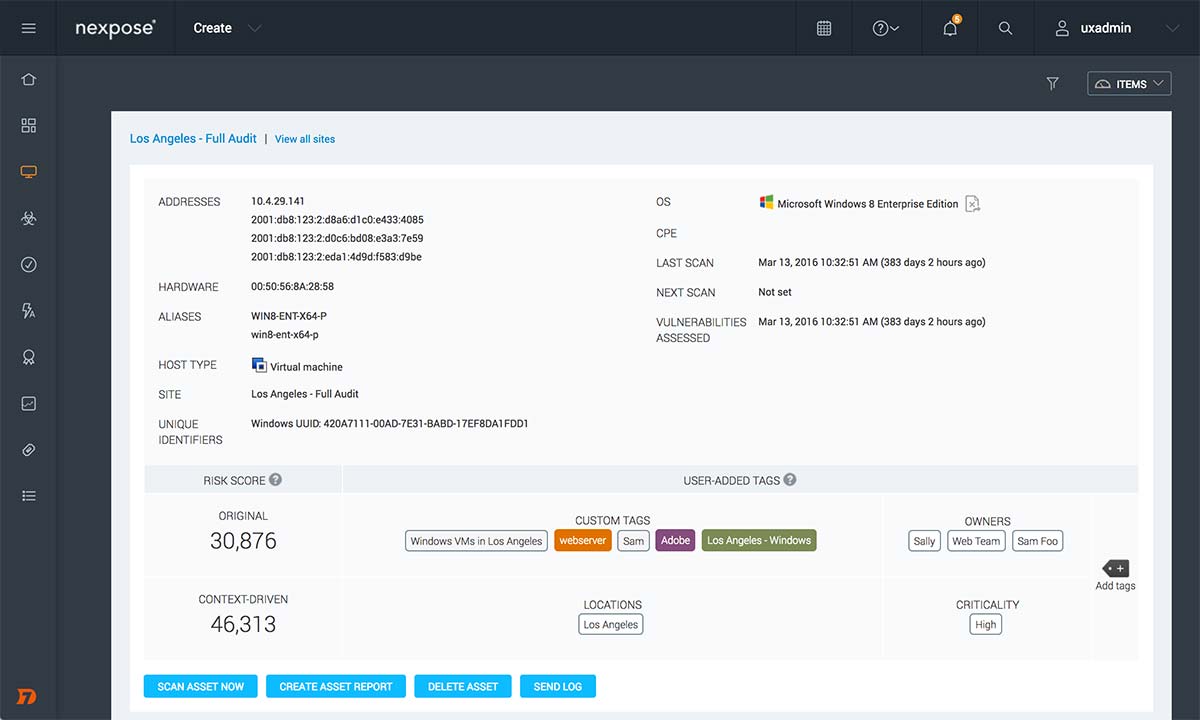
- Review scan results:
- After the scan completes, you can review the results by navigating to the Completed Assets section of the site details page. Click on any asset’s address to view detailed information, including the operating system, asset type, and its calculated risk score.
- The Vulnerabilities Table provides a breakdown of all detected vulnerabilities for each asset, including critical information such as the risk score, exploitability, and potential remediation steps. This enables you to prioritize which vulnerabilities need immediate attention.

Exabeam: Ultimate Rapid7 Alternative
Exabeam is a leading provider of security information and event management (SIEM) solutions, combining UEBA, SIEM, SOAR, and TDIR to accelerate security operations. Its Security Operations platforms enables security teams to quickly detect, investigate, and respond to threats while enhancing operational efficiency.
Key Features:
- Scalable log collection and management: The open platform accelerates log onboarding by 70%, eliminating the need for advanced engineering skills while ensuring seamless log aggregation across hybrid environments.
- Behavioral analytics: Uses advanced analytics to baseline normal vs. abnormal behavior, detecting insider threats, lateral movement, and advanced attacks missed by signature-based systems. Customers report that Exabeam helps detect and respond to 90% of attacks before other vendors can catch them.
- Automated threat response: Simplifies security operations by automating incident timelines, reducing manual effort by 30%, and accelerating investigation times by 80%.
- Contextual incident investigation: Since Exabeam automates timeline creation and reduces time spent on menial tasks, it cuts the time to detect and respond to threats by over 50%. Pre-built correlation rules, anomaly detection models, and vendor integrations reduce alerts by 60%, minimizing false positives.
- SaaS and cloud-native options: Flexible deployment options provide scalability for cloud-first and hybrid environments, ensuring rapid time to value for customers. For organizations who can’t, or won’t move their SIEM to the cloud, Exabeam provides a market-leading, full featured, and self-hosted SIEM.
- Network visibility with NetMon: Delivers deep insight beyond firewalls and IDS/IPS, detecting threats like data theft and botnet activity while making investigation easier with flexible searching. Deep Packet Analytics (DPA) also builds on the NetMon Deep Packet Inspection (DPI) engine to interpret key indicators of compromise (IOCs).
Exabeam customers consistently highlight how its real-time visibility, automation, and productivity tools powered by AI, uplevel security talent, transforming overwhelmed analysts into proactive defenders while reducing costs and maintaining industry-leading support.
More Rapid7 Explainers
Learn More About Exabeam
Learn about the Exabeam platform and expand your knowledge of information security with our collection of white papers, podcasts, webinars, and more.
-
 Blog
Blog
Making the Switch: A Step-by-Step Guide to Migrating from On-premises to Cloud-native SIEM
- Show More


